


Installing an Easy Pull Clutch Kit On A Harley Davidson
Have you ever pulled a clutch handle and thought about how hard it was to squeeze? Some people might just tell you to suck it up and squeeze harder. Some clutch springs can just be hard to compress, but for many is there is something you can do about it. These springs can be changed to lighter ones and counter-weights can be added to the rotating assembly to reduce the effort in pulling the clutch. These methods all involve disassembly of a primary drive, or sometimes even more. There can be an easier/better-looking solution than having an extended handle. An E-Z clutch kit uses an extension to the ball and ramp assembly in a typical 5/6 speed Harley-Davidson transmission. Installing an easy clutch kit on a Harley Davidson requires special tools, but it can be done. The longer extension increases the mechanical advantage of the clutch lever and uses less effort to engage and disengage the clutch.
Harley-Davidson transmissions have an end cover located on the exhaust side of the motorcycle. It is usually oval in shape and held in by perimeter Allen head bolts. To start the install of the easy clutch, you will need to drain the fluid out of the transmission by removing the drain plug. Once the fluid is completely drained, this plate can be removed. If there is an exhaust pipe located in front of the plate, that pipe will need to be removed. Before completely removing the plate, the threaded clutch cable end should be loosened using a wrench. The clutch cable cannot be removed from the transmission end-plate until the end-plate is removed from the transmission.
In the middle of the clutch cable is an adjuster nut. The nut should be loosened to give slack to the clutch cable. Inside the end-plate there is a hook for the clutch cable. The cable can be freed from the hook and removed from the end-plate. This is when a replacement cable, if desired, should be installed. Decorative braided cables are always an option for replacement.
This site and articles contained herein are provided for general informational purposes only and are not a substitute or intended as professional advice. Please be sure to refer to your owner’s manual or consult a mechanic for information specific to your motorcycle. The information contained on this site and articles contained herein are provided on an “as is” basis with no guarantees of completeness, accuracy, usefulness or timeliness and without any warranties of any kind whatsoever, express or implied. Rider Insurance Company and its affiliates (together, “Rider”) assume no responsibility for any errors or omissions in the content of this site and articles contained herein. Any action taken upon this information is strictly at your own risk and Rider will not be liable for any losses or damages in connection with your use of this site and articles. Additional terms and conditions apply and are available at https://model.rider.com/plymouth-rock-assurance-general-terms-and-conditions/.
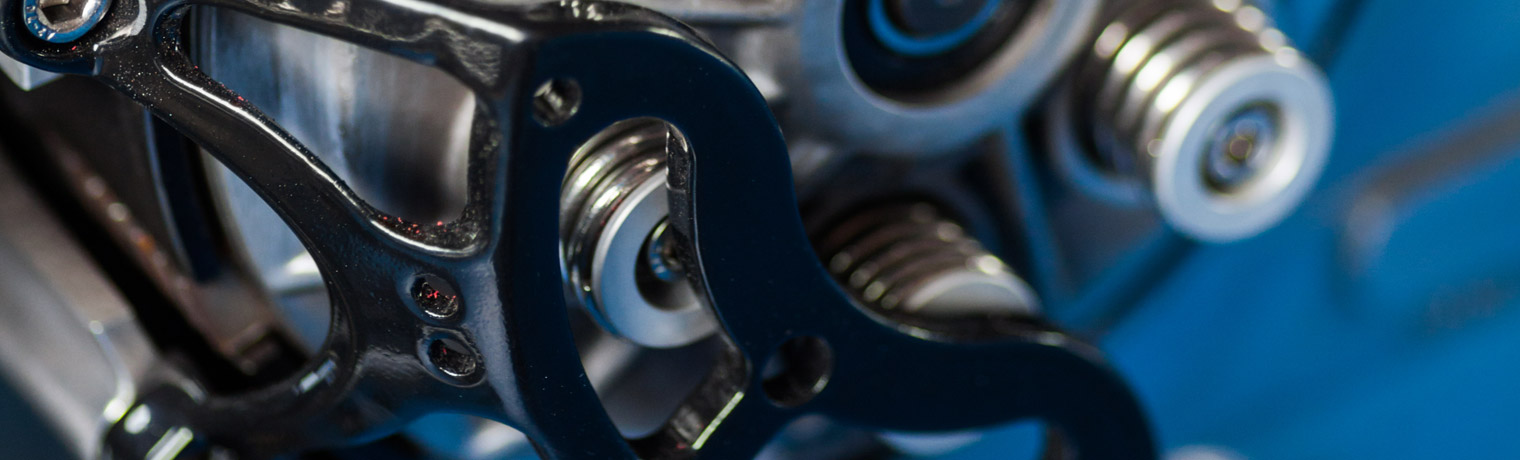
What gives leverage to the handle is the arm on this hook. An E-Z clutch adapter makes the arm longer for a greater leverage. The hook is held in place by a large snap ring that is removed. The hook is attached to a ball and ramp assembly, which is how the clutch engages and disengages. Once you remove the snap ring, the ball and ramp assembly comes apart. The ball bearings are below the ramp, so be careful not to lose them. Clean the entire ramp assembly and attach the new extension to the hook where the clutch cable attaches. It uses a single bolt and nut, which should have thread locker adhesive applied. Grease the ball bearings and assemble the ball and ramp assembly. Using snap ring pliers, reinstall the large snap ring. Since the arm on the ball and ramp assembly is now longer, the clutch cable will have too much slack. The kit should include a spacer, which is located between the transmission end-plate and the clutch cable. An O-ring is located under the spacer, so that oil does not leak out.
After the entire transmission end-plate with ball and ramp assembly is back together, it can be put back on the transmission. Use a new transmission end-plate gasket and torque the bolts back to factory specification. Reinstall the exhaust if you removed it to gain access to the transmission. Take off the derby cover on the primary side of the motorcycle and adjust the clutch using the factory method. Most of the time it calls for threading the adjuster out, until it just has some play in it. Reinstall the derby cover. Tighten the clutch cable adjuster until there is little to no slack in the cable. Pull the clutch lever and make sure it operates as normal. Put the motorcycle in neutral. Start the motorcycle and disengage the clutch, making sure everything works properly before going on a test ride. If you installed everything correctly, the clutch lever should have an easier pull. Your hand will experience less strain and you will develop less fatigue, especially when you are stuck in traffic. And that means more enjoyable riding!
Plymouth Rock Assurance is a marketing name used by a group of separate companies that write and manage property and casualty insurance in multiple states. Motorcycle insurance in New Jersey and Pennsylvania is underwritten by Rider Insurance Company. Each company is financially responsible only for its own insurance products. Actual coverage is subject to the language of the policies as issued by each separate company.